When I made the switch from Windows to Linux, one thing I had forgotten about was that I had made adjustments to my NVIDIA GPU through software such as MSI Afterburner. My current GPU is a RTX 3070Ti, and it can run a bit too hot to my taste, especially since MSI pushed its performance quite a lot.
You can read my post about doing the same thing on Windows.
The starting point
For reference, here are the stats when running a Uningine Superposition Benchmark:
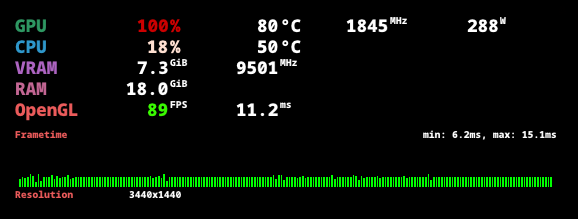
As you can see, the temperature goes high under load (and the fans ramp up a lot). Some people won’t find it too obnoxious, but to me, it is too much. Both the heat it disperses (try playing FFVII Remake during the peak of summer …), as well as the noise generated by the fans having to spin as much as they can to disperse all of that heat.
My goal was therefore to achieve the same results as using MSI Afterburner, but on my fresh Linux install. This post aims to show some options that are available to Linux users on both X11 and Wayland. And yes, there are methods exclusive to X11. Weirdly enough.
Target
My main goal when adjusting performance of my GPU is aiming at reducing both heat and noise, while trying not to lose too much performance in games and other graphical tasks.
The idea is to basically increase the effective performance of my GPU. I don’t really mind losing a bit of performance, if I can make the GPU run cooler and quieter, while still performing in my desired range.
What can be adjusted
Several parameters can be adjusted… But it all depends on your OS. Unfortunately.
Windows users have one thing more than Linux users: voltage. Indeed, the NVIDIA driver on Linux doesn’t expose any way to modify voltage (they removed it during the Kepler days).
We have to find other ways around that.
Overclocking … and some kind of undervolting?
As a reminder, overclocking (or any modifications) come with the possibility of a GPU crash, if it cannot run adequatly. In the end, it’s all about experimenting on heavy workloads, and finding what works best in your setup.
This section aims to present what I did in order to achieve similar performance to stock (or at least performance that fits my goals), while lowering the produced heat.
The voltage-frequency curve
A GPU has a pre-defined voltage-frequency curve. This means that the voltage of the GPU changes as the clock speed varies.
When one overclocks its GPU, what is done is that the voltage used for a frequency will go lower. We are basically undervolting for a specific frequency by moving the whole curve around.
We do this by adding an offset to clocks.
Power limit
GPUs have a set power limit by default. It will try to run its clocks as fast as possible within this set power limit. In the case of overclocking, when reaching the power limit, you will be running at higher speeds than with stock.
By overclocking and keeping the default power limit, no power will be saved, but you will reach better performance in graphical tasks overall.
If you were to change the power limit and reduce it, you’ll be able to reach the best clocks you were reaching before overclocking, but with a lower power limit. This results in using less power for the same performance (and in the end, having undervolted your card).
Locking clocks
One alternative to power limiting is locking the clocks to a specified range. This will make the GPU never go below or above those clock speeds.
Indeed, one issue that may arise with power limit is that, if we were to run it with too low of a power limit, latency or stability issues could occur.
Locking clocks on the other hand is a set parameter, making sure you’ll never exceed the specified maximal clock speed. Combined with a clock offset, this is a way to basically undervolt your card.
My only issue with forcing a maximal clock is that, in some scenarios, your GPU could potentially go higher in clock speeds, and you are restricting it.
The case of X11
Please note that this section is mostly kept for legacy purposes. You could skip ahead to the Wayland section, which enables you to do the same things, but agnostically from your display server.
X11 has been my display protocol since I switched to Linux, and it has been up to… A few days ago. Every person slightly familiar with Wayland and NVIDIA probably understands why it has been so.
X11 had one thing that Wayland no longer haves (at least for now): nvidia-settings, or as it is called “NVIDIA X Server Settings”. The name basically says it all: it is a software that’s only useable on X servers.
Enabling coolbits
Before proceeding, we have to enable coolbits on X11.
I’ll just link to the Arch wiki on Overclocking and cooling, which does a good job at explaining what they are, and how to enable them.
NVIDIA X Server Settings
NVIDIA X Server Settings is both a CLI and a GUI application, which allows to configure the X server, as well as making changes to the configuration on the Nvidia graphics driver.
This allows running the following commands:
nvidia-settings -a [GPU:0]/GPUGraphicsClockOffsetAllPerformanceLevels=<offset>: offsets all clocksnvidia-settings -a [GPU:0]/GPUGraphicsClockOffset[1,2,3,4]=<offset>: offsets clocks for the specified performance levelnvidia-settings -lgc <min>,<max>: locks the clocks between the specified range
NVIDIA SMI
NVIDIA SMI is the System Management Interface, and isn’t a Linux only tool. It also exists on windows, and is based on top of the NVML (Nvidia Management Library).
It’s the tool to use to manage and monitor NVIDIA GPUs (when ran as an administrator in most cases).
We need to run this one command:
nvidia-smi -pm 1: turns on persistence mode (required as the driver will unload if no clients are connected to it)
Persisting changes between reboots
The issues with all of these changes it that they won’t be kept between reboots. You’d have to re-type these commands every time.
You will need to enable driver persistence mode on each reboot as well.
Power limit and systemd
Simply create a new file Then create another file Finally, run the following command:Persisting power limit can be done as pointed out in GWE’s README.
/etc/systemd/system/nvidia-tdp.timer and paste the following text inside:[Unit]
Description=Set NVIDIA power limit on boot
[Timer]
OnBootSec=5
[Install]
WantedBy=timers.target
/etc/systemd/system/nvidia-tdp.service and paste the following text inside (replace XXX with the power limit value you want to set):[Unit]
Description=Set NVIDIA power limit
[Service]
Type=oneshot
ExecStartPre=/usr/bin/nvidia-smi -pm 1
ExecStart=/usr/bin/nvidia-smi -pl XXX
sudo systemctl enable nvidia-tdp.timer
Note that since it relies on nvidia-smi, this properly works on Wayland as well (and even Windows!).
Clock offset and autostart
For clock offsets, I found the best way was a simple autostart script (or whatever works best for you own environment).
It should just run the nvidia-settings -a "[GPU:0]/GPUGraphicsClockOffsetAllPerformanceLevels=<offset>" command.
The case of Wayland
Since NVIDIA has released its 555.58 drivers, and at least on KDE, Wayland has become 100% useable on my GPU. This meant I finally was able to switch to it.
But switching to Wayland came with NVIDIA X Server Settings no longer working. I had forgotten about it, until I saw that the autostart command no longer worked.
What follows does not only work under Wayland but also under X11, and even Windows (albeit the persistence between reboots for the latter).
NVML our savior
As I said before, NVML is the management library. Fortunately, its API is seeing many changes recently, making it a viable way to do the same things we’ve been doing on X11.
The only issue is the lack of a tool to replace NVIDIA X Server Settings, as nvidia-smi doesn’t make such changes possible.
There are however some wrappers written in Python or Rust which we can use.
That’s why I wrote a tiny Rust script using nvml-wrapper, to allow me to perform the same changes as I was making on X11 - and become display server independent.
Yes, the whole X11 section is obsoleted by this way of doing it, but nvidia-settings is an application written by NVIDIA, while this is something written by me over a wrapper written by someone else over NVIDIA’s APIs.
It will probably keep evolving in the future, with newer APIs being exposed.
Keep changes between reboots
As with nvidia-settings, those changes won’t persist between reboots.
The safest way is to apply the changes on user login. If we were to apply them on OS startup, we could be crashing the GPU on startup, which could cause issues and prevent us from properly entering the system, and having to debug it.
You can for instance put the script into /root/, and then create a custom sudo rule to prevent having to type your password:
vim /etc/sudoers.d/nvidia-performance-adjust
<username> ALL=(root) NOPASSWD: <path_to_the_script>
Note that this can be dangerous. Adding sudo rules is an operation you have to be conscious about.
You can now simply use an autostart entry or whatever you wish to run this at user login, with your own parameters.
Driver persistence mode
You’ll still be needing to apply persistence mode. I detailed it in the X11 section, about persisting changes between reboots.
Concluding notes
This has been a long post, but I felt the need to write everything down, both to remind me the trouble I had to go through, as well as to give different ways of doing things and solve problems that may arise.
In my case, here’s an example of the stats I’m now getting when running a Uningine Superposition Benchmark:
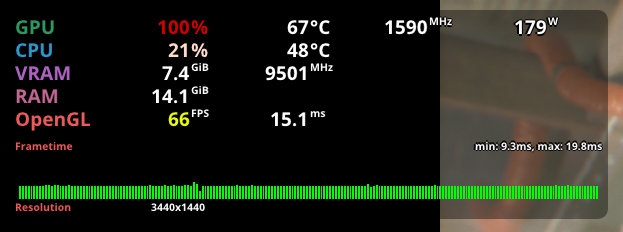
You may see the framerate being lower than it was on stock. I did lower the performance a bit, but I’m okay with it as it enables me to keep performance I’m glad with, while greatly reducing both fan noise as well as produced heat.
The difference is not as drastic as those screenshots make it look, it’s only one sample during the benchmark, mostly to highlight the difference in temperatures. The parameters can of course be adjusted depending on your GPU and needs
Additional tools
Here are some tools and command lines I thought I’d mention :
- Current power draw:
nvidia-smi -q -d POWER -l 1 | grep "Power Draw" - Current voltage:
nvidia-smi -q -d VOLTAGE -l 1 | grep "mV" - A tool to monitor GPU usage:
nvtop
Sources
- https://docs.nvidia.com/deploy/nvml-api/
- https://linustechtips.com/topic/1259546-how-to-undervolt-nvidia-gpus-in-linux/
- https://forums.developer.nvidia.com/t/nvidia-gpu-overclocking-under-wayland-guide/290381
- https://forums.developer.nvidia.com/t/undervolting-can-damage-video-card/214471/3
- https://github.com/NVIDIA/open-gpu-kernel-modules/discussions/236